Introduction
Restorative dentistry aims to restore the form, function, and esthetics of teeth affected by caries, trauma, wear, or developmental defects. While modern restorative materials have dramatically improved clinical outcomes, the success of a restoration is often determined by the clinician's attention to detail during each procedural step.
Many restorative failures are not material-related but technique-related. Errors during isolation, cavity preparation, bonding, matrix placement, composite placement, curing, and finishing can compromise the restoration from day one.
This article highlights common clinical mistakes during direct restorations and provides evidence-based corrective measures that can help clinicians achieve predictable long-term success.
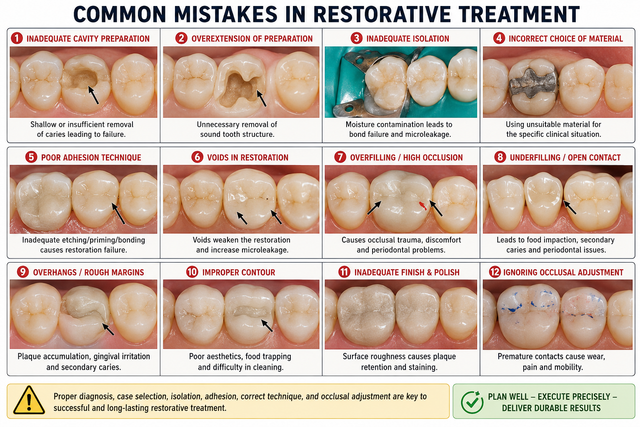
INADEQUATE ISOLATION
Failure to achieve proper moisture control is one of the most common causes of restorative failure. Contamination from saliva, blood, crevicular fluid, or moisture can interfere with bonding and significantly reduce bond strength.
Clinical Consequences
Reduced adhesion
Marginal leakage
Postoperative sensitivity
Debonding of restoration
Clinical Correction
Gold Standard: Rubber Dam Isolation
Benefits include:
Moisture control
Improved visibility
Better patient safety
Enhanced bond durability
If a rubber dam cannot be used:
Employ cotton rolls
Use high-volume suction
Utilize gingival retraction techniques
Clinical Insight
Even a few seconds of saliva contamination after etching can dramatically reduce bond strength. If contamination occurs, re-etching and reapplication of adhesive should be considered.
OVER-PREPARATION OF TOOTH STRUCTURE
Excessive removal of sound tooth structure during cavity preparation. Many clinicians continue to prepare cavities according to traditional GV Black principles despite the availability of adhesive restorative materials.
Clinical Consequences
Weakening of tooth structure
Increased fracture risk
Pulpal irritation
Reduced restoration longevity
Clinical Correction
Follow principles of minimally invasive dentistry:
Remove only infected dentin
Preserve affected dentin when appropriate
Maintain enamel whenever possible
Clinical Insight
The strongest tooth is often the one with maximum remaining natural structure rather than the one with the largest restoration.
FAILURE TO DETECT CRACKS BEFORE RESTORATION
Restoring a cracked tooth without identifying the crack pattern.
Clinical Consequences
Persistent pain
Fracture progression
Restoration failure
Endodontic complications
Clinical Correction
Before restoration:
Use magnification
Perform transillumination
Utilize bite tests
Assess crack extension
After restoration:
Usually, depending on the extent of the crack:
the restoration may need a crown (if crack is within the coronal part of the tooth structure)
the tooth may need an extraction (if crack is within the radicular part of the tooth structure)
Clinical Insight
A restoration cannot eliminate symptoms if the primary pathology is an untreated crack extending into dentin or pulp.
IMPROPER ETCHING TECHNIQUE
Errors in this category include under-etching or over-etching dentin, incomplete rinsing or over-drying dentin
Clinical Consequences
Poor hybrid layer formation
Reduced bond strength
Postoperative sensitivity
Clinical Correction
Enamel:
15–30 seconds etching
Dentin:
10–15 seconds etching
Maintain moist dentin appearance after rinsing.
Clinical Insight
Over-dried dentin collapses the collagen network, preventing proper resin infiltration.
INADEQUATE DRYING OF BONDING AGENT
One of the most frequently overlooked steps in adhesive dentistry. Many clinicians cure the adhesive immediately after application without sufficient air thinning.
Clinical Consequences
Residual solvent entrapment
Reduced polymerization
Lower bond strength
Increased nanoleakage
Clinical Correction
Apply gentle air stream for:
5–10 seconds minimum until adhesive no longer moves. Ensure solvent evaporation before curing.
Clinical Insight
The bond layer should appear thin and glossy—not pooled or visibly moving.
APPLYING THICK ADHESIVE LAYERS
Excess adhesive accumulation in the cavity.
Clinical Consequences
Poor restoration adaptation
Increased film thickness
Weak interface
Clinical Correction
Proper air thinning creates:
Uniform adhesive fill
Better composite adaptation
Improved polymerization
Clinical Insight
More adhesive does not mean better bonding.
POOR MATRIX PLACEMENT
Incorrect matrix adaptation in Class II restorations or failure to use a matrix band and doing a free-hand restoration.
Clinical Consequences
Open contacts
Overhangs
Food impaction
Gingival inflammation
Clinical Correction
Use: Sectional matrix systems, Separation rings, Proper wedge placement
Clinical Insight
The matrix should recreate natural tooth anatomy before composite placement begins.
INADEQUATE PROXIMAL CONTACT FORMATION
Failure to establish tight interproximal contacts or positioning at the incorrect height of contour.
Clinical Consequences
Food packing
Patient discomfort
Periodontal problems
Clinical Correction
Use sectional matrices
Ensure ring separation
Check contact before finishing
Check for distance from gingiva to prevent impingement.
Clinical Insight
Patients often judge restoration success by whether food gets trapped after treatment.
BULK FILLING COMPOSITE
Placing conventional composite in large increments.
Clinical Consequences
Polymerization shrinkage
Marginal gaps
Cuspal deflection
Postoperative sensitivity
Clinical Correction
Use incremental layering:
Maximum 2 mm increments
Oblique layering technique
Free for members
Keep reading — it's free
The rest of this article is open to DentalReach members. Create a free account, or sign in, and every article on the site opens in full.