

What are elevators?
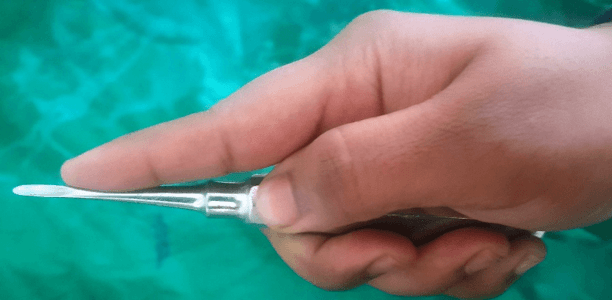
In simple words, dental elevators are the type of instruments used to move (elevate) the tooth from its socket. There are different types of elevators depending upon shape, working principle and size.

Working principles of elevators
Basically they work on 3 principles:
1) Wedge principle: It is the simplest way to use an elevator. In this elevator blade is just pushed between the alveolar bone and the tooth by simple rotatory motions, no other movement is used. Almost all the elevators begin with this principle action and then depending upon type of elevator, next movement is initiated.
2) Lever and fulcrum: After wedging the blade of the elevator, now the shank of the blade is kept over the buccal alveolar bone which will act as a fulcrum. Once fulcrum is set, the operator will move the elevator handle in an up or down manner and elevator blade will move in opposite direction with force multiplied 3 times.
This movement will move the tooth towards the occlusal plane (tooth being elevated). So this is the most common way to use an elevator and that’s the reason why elevators are called ‘ELEVATORS’.
It is like see-saw in which when one side goes up other side goes down.
3) Wheel and axle: this is the most powerful way to use an elevator. We will not talk about it as it has high complication rate and it is now being discouraged to practice.
What are luxators then?
These are nothing but elevators only but they are used only and only to luxate the tooth, that means they cause minimal movement in the tooth which alone may not be sufficient to move the tooth out of the socket. These are fine bladed instrument which is inserted ( wedged) between the tooth root and the alveolar bone and by means of wedging they disrupt the stability of the tooth, then it is easier to extract such luxated tooth by means of forceps. It has an advantage that it causes minimal damage to the surrounding tooth or bone and the chances of alveolar bone fractures are minimal. But the disadvantage is that it can not generate heavy forces, so if the tooth is firm with very strong periodontal support, then it is hardly of any use. Hence, locators are mainly indicated for the extraction of root tips.
10 tips for successful use of elevators – E-X-T-R-A-C-T-I-O-N!
1) E= engage right.
Whenever we use elevator between two teeth to luxate one tooth, then it actually damages both the teeth equally and simultaneously so it should be used only to luxate the tooth which is the last tooth in the arch. (for example, use between 7 and 8 to luxate 8, but you can ideally not remove 7 by taking support from 8 or from 6 using elevators)
2) X= XL, XXL
….size does matter.
Larger or bigger the blade heavier the forces so always start with the smaller blade elevator and then gradually keep shifting to bigger elevator (you need to buy straight elevators with various blade size, do not keep using just one.)
3) T= Tip.
Never use Cryer’s or sharp tip elevator in apical region of the lower 7 and lower 8 as you may accidentally damage the inferior alveolar nerve.
4) R= Rest.
Always use left hand fingers as a rest and guard against the tip of the elevator while in use so as to protect soft tissue injury to the patient in case elevator slips.
5) A= avoid.
Avoid the use of elevator in following situations:
- When an implant supported single /multiple prosthesis is there mesially.
- Very old patient with atrophic mandible.
- Low lying maxillary sinus very close to the roots and one of the root is involved in periapical pathologies.
6) C= caution.
Be careful. While using straight elevator in posterior maxilla, make sure the angulation is kept perpendicular to the tooth and not parallel to the tooth, otherwise the elevator may slip into the sinus along with the tooth.
7) T= Temporo-mandibular joint.
Always use a bite block whenever you work in mandible to support the temporo-mandibular joint of the patient.
8) I= incremental.
While using an elevator, whenever you activate it, consider it as the accelerator handle of a bike and rotate it slowly to reach the maximum speed (force in this case) and do not rotate fully in one go. Rather increase the force in increments.
9) O= Only buccally.
In mandible, always use elevator from the buccal side only.
10) N=nice grip.
Hold the elevator in particular firm manner only. While holding it, your hands and the elevator handle both should be dry .
I have summed up all these tips in the form of a small video. Please have a look at it. Hope it elevates your level of understanding and skill and in turn it elevates your practice level professionally. Enjoy your extractions! And feel being ELEVATED.


Comments