First Impressions Are The Last Impressions – So Make The Best Impression!
According to a recent survey conducted by Kelton Global for American Academy of Cosmetic Dentistry (AACD), people believe the most memorable feature after meeting someone for the first time is their smile (48%), speech(25%),clothes(9%) and smell (8%).


According to Dr Ron Goodlin, President of AACD, we live in a fast paced life that is technology driven and as many of us interact over digital platforms, more people are getting their first impressions of us in a profile picture or video.

This means that it is essential to put our best face and our best smile forward at all times!
As we perform mock drills to treat our need based, pain related treatments with the appropriate protocols and with seamless work flows, we must also not forget that there is a part of smile makeovers that connects want based to need based procedures. These are – tooth traumas and front tooth fracture cases. Even in COVID times, tooth trauma is considered as an emergency. Some of these front teeth could become sensitive, discoloured and ultimately painful if fractured near the pulpal tissue. This depends on the type of trauma or fracture. You can read about dental trauma and nerve damage to teeth here.
Class IV Fractures involve horizontal or angular fractures and chips involving the mesial and distal incisal angles of the anterior maxillary and mandibular teeth. If restored correctly, they are the easiest way to improve the patient’s smile and could improve phonetics and functionality as well.
While restoring a Class IV cavity it is important to use the neighbouring tooth as a guide or reference in order to achieve seamless aesthetics and surface texture characterization. In case of the central incisors the symmetry ideally needs to be static with both teeth looking like mirror images. In case of lateral incisors and canines, dynamic symmetry with slight differences in contralateral teeth is acceptable and bring out an interesting and natural appearance.
Age is an important factor to be considered when restoring a horizontal fracture of the tooth. Giving a mamelon effect and incisal translucency with halo on a tooth of a 60 year-old looks unnatural and creating a flat incisal edge with a opaque composite shade in a 6 year old can look completely out of place.


It is not self-expression if it is a copy or clone. We can not create the same morphology or characterization for every patient . The beauty lies in trying to replicate the natural tooth in terms of looks, both shape and shade. Younger teeth are brighter and high in value with pronounced primary and secondary surface characterisation like transitional lines and perikymata . Older teeth appear darker due to wearing of enamel and darker dentin showing, thus shades with darker chroma, fracture lines, less surface texture and smoother surface give a more natural appearance in them.
Case Report
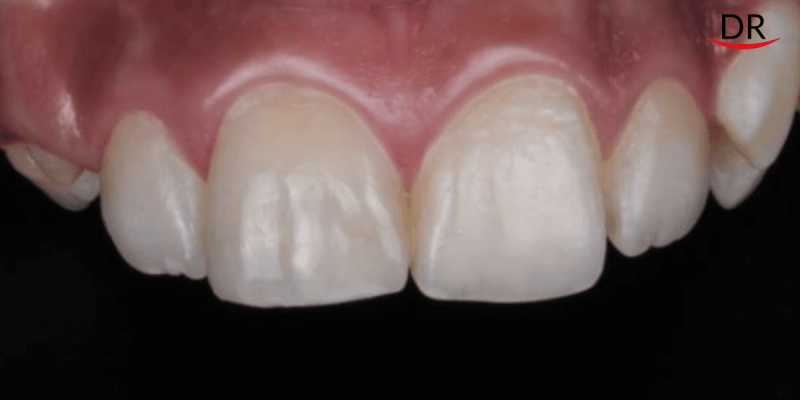
Here, I present a case of a 12 year old with a horizontal fracture on 11 due to trauma. The tooth had throbbing pain and there were periapical changes on the radiograph showing inflammation . We did a root canal therapy first and then decided to build up the tooth with composite. In all of my anterior cases with root canal therapies, I refrain from cutting down the tooth for a crown or an indirect veneer unless absolutely essential. The anterior teeth undergo tensile forces more than compressive forces, hence a resilient material like composite does a good job at delivering aesthetics and fulfilling functionality in the anterior aesthetic zone. In a young patient, I always prefer to do minimally invasive procedures since the gingival margins are still dynamic and the occlusion may also change as all the teeth erupt gradually.


Shade selection and surface characterization contribute to a perfect looking restoration. The shade is selected at the first appointment itself before rubber dam isolation and dehydrating the tooth.

Placing mesial and distal transitional lines accurately to match the apparent face of the neighbouring tooth is an important step to achieve a vital looking restoration. This also creates depth to match the light bending on both the guide tooth and the tooth to be restored.


In this case, if the patient had retained the original tooth’s fractured fragment, re-attachment of the same fragment can also be done using composites. You can read a case report on fragment re-attachment here.
Step by Step Protocol for Achieving a Class IV Restoration
Let us discuss step by step protocol to achieve a predictable recipe for a Class IV Restoration.
Mock-Up: We begin any Class IV fracture case with a study model which can be made by pouring an impression made in addition silicone. Once we have the defect in stone, either wax or composite can be used to build the tooth anatomically. A putty index of this built up tooth can make the case predictable and control the bulk of the material during layering techniques. A matrix band direct build up may not reproduce adequate results in the hands of an inexperienced operator.
Shape Selection: Dentin shades are best selected by placing a composite button on the cervical area . Body shade can be selected using the middle one third area of the tooth and enamel shade is best selected by placing against the incisal one third region. All of these should be cured since composite after curing may appear different. Once the shade is decided it can be easily flicked off using a sharp instrument.
Protocol: Bevel – Etch – Bond – We carry out the procedure by making an infinity bevel using red coarse disc (3M Soflex disc) at an angle of 45 degree followed by polishing with a silicone point. Apply 37% phosphoric acid for 15 seconds on enamel and 5 seconds on dentin (selective etching) followed by washing thoroughly but keeping the area moist, followed by scrubbing bonding agent (3M Universal bond) for 20 seconds, air drying for 20 seconds and curing for another 20 seconds.


Layering – We start building the palatal wall, using the putty index we previously made, in a clear translucent shade to make sure the mamelons and halo are well expressed against a bluish or greyish backdrop. The halo can be made by placing A1 Dentin shade (3M) or White opaque tint (Paint on kit : Coltene) depending on space available for the build up. Mamelons are made in a dentin shade as per the fractured portion of the tooth followed by a body shade if the space allows. Many a times a dentin shade, followed by an enamel shade (2 step technique) can also give good results. Enamel shade layering is done using enamel shades (3M) as a final step of layering.
The exact recipe for a life like restoration comes with many trials and errors in an early career, however it has been simplified a great deal by the availability of composites of various opacities today.


Oxygen Inhibition Zone: Once the build up is complete, we apply KY Jelly to ensure removal of oxygen inhibition zone and then light curing it for 40 seconds.
Finishing and Polishing
Finishing and Polishing protocols require time and patience from both the clinician and the patient. We start with a red ring sharp bur that removes gross excesses and blends the restoration with the tooth surface. All finer procedures can be carried out by a carbide 10,20 and 30 fluted burs that ensure no tooth structure is damaged and all changes are made in composite only. Soflex Discs from 3M are the perfect armamentarium to have for any beginner to carry out changes in shape and texture. Transitional line angles and secondary characteristics help in masking the restoration and creating an illusion. Enhance kit from Dentsply is a great kit for Polishing protocols with fine and extra fine pastes. Jiffy brush from Ultradent is a goat hair wheel which imparts great lustre to the restoration. A cotton buff from Shofu or Cosmedent is usually the last step that one can do to achieve superlative finish and polish to a restoration which should last years without dulling out or accumulating stains. All finishing and polishing protocols must be followed as per manufacturer’s instructions.


Conclusion
To practice in the COVID era is not impossible but is definitely difficult and will take a lot of changes with clinical work flows and mindsets. However, it is not disappearing any time soon so we as dentists must adapt to this situation and cater to pain and trauma related treatments in the best way possible. We can not control the situation and circumstances however staying determined and positive is certainly in our control.
Note: Even crown restorations can be used for aesthetic correction of a single anterior tooth.
Disclaimer – DentalReach does not endorse, promote or associate with any product or material mentioned in this article. This article is meant for informative purposes only.


Comments