– Dr Anudeep Myakal

Abstract
Occlusal caries in molars and premolars is the most common problem we encounter in our patients. With patients being more conscious about their esthetics now, more and more patients demand tooth-coloured fillings for posterior teeth over silver ones. Caries involving enamel and dentin with cuspal involvement too, can be successfully treated using direct composite resin with good esthetic and functional outcome. Anterior crown fractures are common among school children. This impacts their function, esthetics, speech and psychology. An esthetic zone clinician must propose an exact and minimally invasive treatment plan. Achieving promising result in both esthetics and strength, is the greatest desire for patients as well as for parents. This case series describes a case each of esthetic direct composite restoration on a mandibular right first molar and fractured permanent maxillary central incisors, with a special note on shade selection.
Introduction
Caries in posterior teeth is very common as permanent mandibular molars are the first to erupt in the oral cavity and difficult to reach for cleaning. Coronal fractures resulting from dental trauma most frequently occur in the maxillary anterior teeth of children and adolescents. Adult anterior teeth may also suffer due to accidents, though less frequently than adolescents. Direct and indirect restorations are clinically successful treatment options for carious posterior teeth and fractured anterior teeth. Direct restorations are performed without laboratory phases. They usually involve enamel /dentin acid etching technique with adhesive systems and one or more types of composite resins.
This article reports a case each of a compound cavity on mandibular 1st molar and permanent maxillary central incisors with incisal crown fracture, restored using composite resin as direct restorations. Since shade selection is crucial for the anterior zone, it is described in elaborate detail in case report 2.
Case Report 1
A young engineering student reported to the clinic unhappy with the cement restoration on his mandibular right first molar.

We discussed and showed him some of our esthetic composite cases and patient immediately agreed to the treatment plan suggested to him.

- G-aenial A3 shade was perfectly matching shade in this case. (See section on ‘Shade Selection’ for this more details)
- After isolation, etching and bonding procedure was done as instructed by manufacturer.
- We started with first layer of flowable composite, then cusp by cusp build up according to the digital prescription with packable composite.
- We used LM Arte™ instruments for making natural pits n fissure which were then stained with yellow and ochre color from Coltene which makes restoration life-like.
- Finishing of the restoration done with red and yellow ring diamond burs (Mani) and a finishing kit (Shofu).
- Polishing of the restoration was done (Astropol Polishing kit , Ivoclar Vivadent).


Case Report 2
A 10 yrs old naughty child presented first time to the clinic with broken upper front teeth due to trauma.

where patient was not even ready to smile.
On examination, we found that there is Ellis class II fracture involving enamel and little dentin on upper 11,21. After clinical & radiological examination, we found that there is no pulpal involvement and no periapical pathology with 11 or 21. Vertical and horizontal tender on percussion (TOP) test was negative for both 11 & 21.

which was used for making palatal index.

We decided to go with minimally invasive and best treatment option in this case i.e ‘direct composite restoration ’ and explained the procedure to the child’s parents.

- The tooth was prepared by giving bevel of first 45˚, then 15˚ with finishing & polishing of both buccal & palatal surface.

- After the isolation of the area, total etching on both buccal and palatal surface was done for 15 sec and the etchant was cleaned for 30 sec.
- Then, we proceeded for bonding with G-aenial premio bond. Applied a layer of bonding agent waited for 10 sec, air dried for 5 sec and cured (Bluephase curing light, Ivoclar) for 10 sec on both buccal and palatal surface.
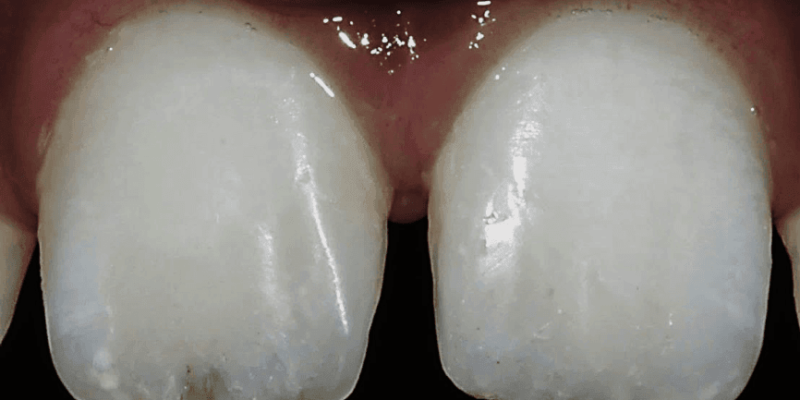
- By using the palatal silicon key, the palatal wall was built up with junior enamel (JE) and cured for 20 sec, after that remaining tooth surface was built up using A1 dentin shade and cured for 20 sec.
(See section on ‘Shade Selection’ for this more details)
- Here, we also used opaque tint from Coltene to create white spots in the mesial middle third of the tooth and blue tint in incisal part of tooth to create incisal halo effect and cured for 20 sec.
- Incisal edge was free of A1 shade, where CT (clear translucent) used for creating incisal translucency.
- As final layer, JE was applied on the complete surface of restoration and cured for 20 sec.
- Finally glycerin gel was applied on whole surface and cured for 1 min to remove oxygen inhibition layer.
- Gross finishing and surface texture was done by using red and yellow burs from Mani.
- Composite finishing was done (Finishing kit,Shofu ).
- Polishing of the composite was done (Astropol, Ivoclar Vivadent).


Discussion
Current direct adhesive restorative systems have numerous advantages such as reversibility, durability, low cost and speed of treatment. The dentist should choose the restorative system according to each situation. The system used in this case series is from GC. The dentin resin in the restorative systems used has a micro hybrid composition, while enamel resin is nano-hybrid, while in both resins pre polymerized fillers are also present, providing increased polishability for external layer of restoration.
In the first patient, maximum tooth structure was conserved when the existing restoration was removed, thus preserving enamel at margins of the preparation and favoring the adhesion and longevity of the adhesive procedure. In the second patient presented, the restoration was placed in two appointments, one tooth each, including finishing and polishing. Hence, each case is unique and preparations have to be modified according to the situation.
The composite resin restoration should provide satisfactory treatment results for young and adult patients both. Initial planning is essential for the best esthetic and functional results from restorative procedure. The composite layering is the key to obtaining esthetically successful restorations. Young teeth show a naturally high value and thus require resin with such characteristics consequence, the reproduction of enamel should be done with composite resin that presents transparent characteristics.
Shade selection
Natural tooth possesses translucency, opalescence and fluorescence, all of which must be replicated by the restorative material to achieve clinical success. Enamel translucency varies from tooth to tooth and from individual to individual. The presence or absence of color, enamel thickness, degree of translucency and surface texture is essential component in determining translucency. Variable shades and opacities that allow the reproduction of the chromaticity and translucency/opacity of enamel and dentin are available. The correct characteristics of the dental structure to be reproduced in a simplified way was presented in this case series.
It is important to select the shade keeping all the dimensions of color in mind, after completion of scaling and polishing. In these cases, we used button technique of cured composite because there are chances of composites changing the color after curing.


Value is most important entity because our eyes are sensitive to the value of color.

- The technique of intrinsic characterization of composite resin restoration with stains is routinely used in dental clinics. Several manufacturers offer stains that enable individualized and customized composite resin restoration. In the second case, the opaque and blue stains used. These stains should be applied carefully with fine instruments like Flowable art instrument from Tokuyama. In the first case, yellow and ochre stains were used, while in second case, opaque tint was used in the mesial middle third of the tooth to create white spots and blue tint in incisal part of tooth to create incisal halo effect
Conclusion
The recent advancement in composite materials enables us to reproduce the natural anatomic form with function in a beautifully conservative manner. When we implement conservative approach technique we are in fact allowing for the possibility of further esthetic option in the future, which is particularly important for a young patient.

References
- L. Vanini “Light and Color in composite restoration”, Practical Perodontics and Aesthetic Dentistry, vol. 8, pp. 673-682,1996.
- P. Magne and J. Holz, “Stratification of composite restoration: systematic and durable replication of natural aesthetics”, Practical Perodontics and Aesthetic Dentistry, vol.8 pp. 61-68 1996.
- D.Dietschi,“Optimisingaestheticsandfacilitatingclimicalapplicationoffree hand bonding using natural layering concepts”, British Dental Journal. vol. 204, no.4, pp. 181-185, 2008
- Andreasen, Jo, Andreasen FM. Textbook and color atlas of traumatic injuries to teeth. 4th ed. 2007
- LesageBrian,MilnarFrankandWhobergJenifer.Achivingtheepiomeof composite art creating natural tooth esthetics, texture and anatomy using appropriate preparation and layering technique. 2009;11 34-48.
- Robert A. Lowe, Advance in composite resin dentistry. Inside Dentistry article vol. 11 no.12.
- Newton Fahl, “Predictable Aesthetic Reconstruction of Fractured Anterior teeth with Composite Resin”, The aesthetic Chronicle 1996.


Comments