– Dr. Deepa Ravichandran


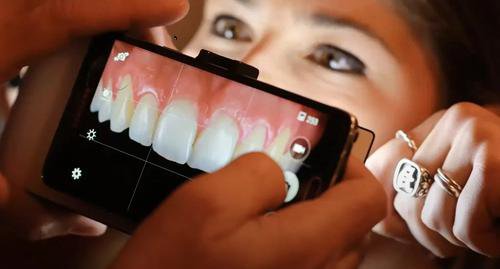
Mobile Phone for Dental Photography?
The trend of using one’s mobile for dental photography is catching on quickly, mainly because –

- It is relatively cost effective, especially as compared to a DSLR. For someone who is beginning out on a fresh dental practice, this seems to be a wiser option to start with.
- The equipment is already available on hand.
- Any extra armamentarium is relatively inexpensive.
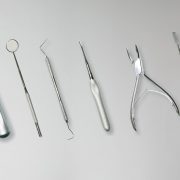
What are the items needed for Mobile Dental Photography (MDP)?

Why the need for MDP?
Experienced dentists know this – dental practice is not about dental practice alone. It’s also about convincing the patients and avoiding legal hassles. Whether you have resumed practice after a while, or are just starting out, one fact does not change – the importance of documentation.
Documentation is important to –
- Maintain a record of the journey that both you and the patient undertook, from start to finish, especially in complex cases.
- Aid in case presentations.
- In case of any dispute, to provide evidence.
Step-by-step protocol for MDP
1. Clip-on Selfie Light
When the flash of the mobile camera is used for intra oral pictures, it bounces off the surface of the teeth and gives an eerie glow, which cannot be edited out, completely destroying the purpose of the image.

2. Contrastors
These are used to give the illusion of a black background intraorally. As the name suggests, they provide the backdrop for a perfect contrast between the pink and the white in the mouth.

3. Intra-oral Mirrors
The cheap plastic intra-oral mirrors fog easily, do not provide adequate clarity and get scratched in no time. It would be wiser to invest in good quality glass intra-oral mirrors, as this will end up being a necessity in day-to-day practice. They come in two sizes usually, small and medium. When not in use, they should be stored carefully, to avoid accidental damage and unwanted scratches, which in turn will affect the quality of the image. After usage, they need to be cleaned, as we are using it in a patient’s mouth. A little cotton, damp with isopropyl alcohol should do the trick.

4. Macro Lens
These are needed when you want to capture the macro texture, be it stippling of gingiva, texture on crowns, composites, dentures etc. The “macro mode” on most mobile cameras is sufficient, but for more high-end photography, you may want to use an external macro lens.

5. Three Angles
For full protocol & case documentation / presentation, all three angles are a must, especially those cases involving both anterior and posterior teeth along with any kind of occlusal rehabilitation. These three angles are –
- frontal
- left lateral and
- right lateral.
This is to understand the pre-op occlusion present, overjet, overbite and inclination of upper anteriors.

6. Good Photo Editor
There are plenty of photo editors available. Basic editing includes cropping out all unwanted bits among other parameters. Too many creative liberties are frowned upon, as these photographs are meant to be professional in nature and not for recreation.

7. Monochrome
This is a very important concept in dental photography showing an esthetic match of direct / indirect restorations with adjacent natural teeth.

By The Way…
All the above photographs are of actual cases that I have worked on, though not of the same patient, as I have used different photographs to illustrate different points. They have all been clicked by me, using my mobile phone and the above-mentioned armamentarium. Mastering MDP takes a fair amount of time, effort, patience and skill, as with any new activity. Again, the photo collage with the images and text has been done by me. The images should be visually attractive – presentation matters!
Every well clicked photograph tells a story! What’s yours? Happy clicking!
Watch this amazing video by Mobile dental Photography
You can also read: Smile Designing : Documentation To Execution by Dr Sanah Syed
FAQs
What is the best smartphone for dental photography?
Ans: Many smartphones these days have excellent camera capabilities. However, iPhones are widely popular for dental photography due to their advanced camera features and ease of use.
What is the best lens for dental photography with an iPhone?
Ans: The iPhone’s built-in lens is already good for dental photography. However, you can get even better results by using attachable lenses such as the Olloclip or Moment lenses.
What are the best camera settings for intraoral photography?
Ans: The best settings for intraoral photography depend on the lighting conditions and the camera you are using. However, in general, you should use a low aperture setting, a high shutter speed, and a low ISO setting.
Can I take good dental photos with my mobile phone?
Ans: Yes, it is possible to take excellent dental photos with a mobile phone. However, using an iPhone or a high-end Android phone will yield better results.
What is the best camera for dental photography?
Ans: There are many good cameras for dental photography. However, Canon EOS Rebel T7i and Nikon D7500 are popular choices among dentists.
What is the best macro lens for dental photography?
Ans: The Tamron SP 90mm f/2.8 Di Macro 1:1 VC USD is considered one of the best macro lenses for dental photography.
Can I take dental photos with my DSLR camera?
Ans: Yes, DSLR cameras are excellent for dental photography. In fact, many dentists use DSLR cameras for their practice.
What equipment do I need for dental photography?
Ans: At a minimum, you need a camera, a macro lens, and a ring flash. However, you can also use other equipment such as diffusers, polarizers, and tripods for better results.
What are some dental photography techniques to take better photos?
Ans: Some techniques to take better dental photos include proper framing, using proper lighting, focusing on the correct area, and using the appropriate camera settings.
Can I take a course to learn more about dental photography?
Ans: Yes, there are many online courses and resources available to learn more about dental photography. Contact us in the live chat or email us for more details.


Comments